Mommy Octopus

We can all use a few more hands

  • Giveaways
  • Travel
  • Recipes
  • Disney World Tips
  • Homeschool
  • Law Enforcement Support
  • PR Inquiries
  • Contact Me
  • About Me

Fun to Make: Edible Reindeer Treats

November 21, 2019 By MommyOctopus Leave a Comment
By clicking my links, I may earn a small commission to support this blog. Please see our Disclosure Policy.

I can’t believe Christmas is only a few weeks away!  I love making fun treats for my kids and their friends and these reindeer are so fun to make!  These Reindeer Treats can be the feature item to your holiday gathering, but they are also simple enough to make for a classroom party.  All you need to do is run to the store, grab a few ingredients and they can be put together in a snap.  Kids will love them even though they are almost too cute to eat.

Ingredients Needed:

  • Little Debbie Swiss Rolls
  •  Reese’s Mini Peanut Butter Cups
  • Mini Candy Canes
  • Red M&M Candies
  • Candy Eyeballs
  • Pretzel Sticks
  • Mini Marshmallows
  • Chocolate chips for melting

Instructions:

Melt a couple handfuls of chocolate chips in a microwave safe bowl to prepare for assembly.

Lay out a sheet of parchment paper to work on your reindeer.

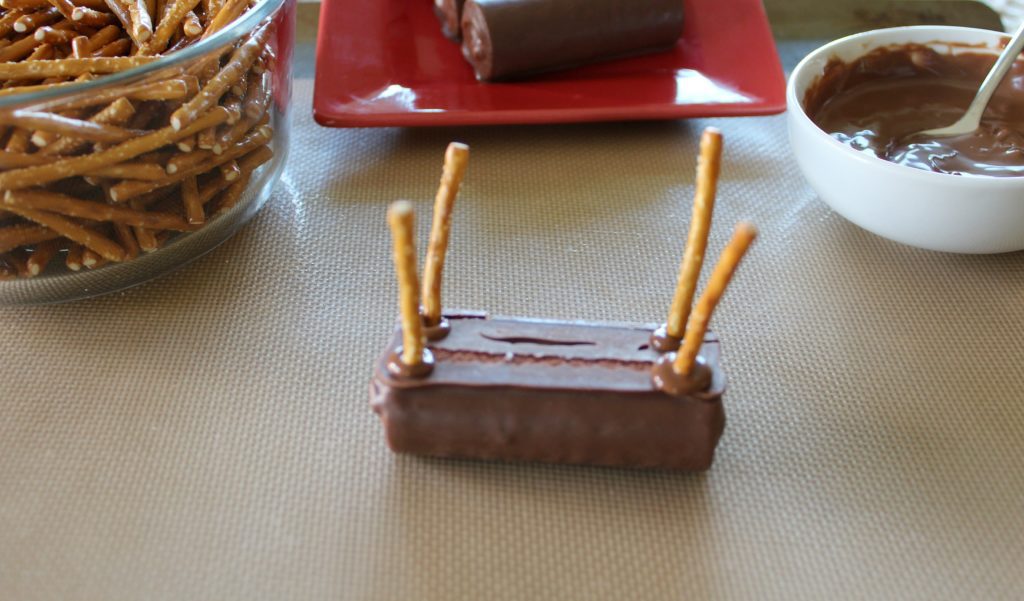
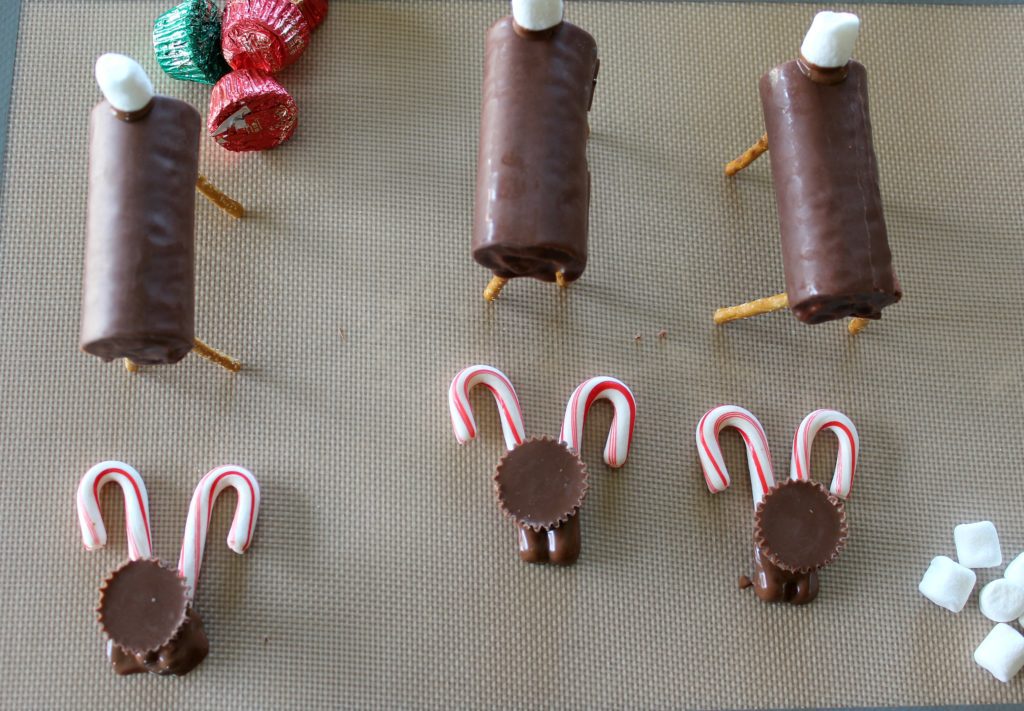
Turn a Swiss Roll upside down and dip the end of pretzel sticks in melted chocolate and insert into Swiss roll slightly to make the legs. Make sure all four pretzels are equal in length after they are inserted in the Swiss Roll to ensure that the reindeer will stand up.

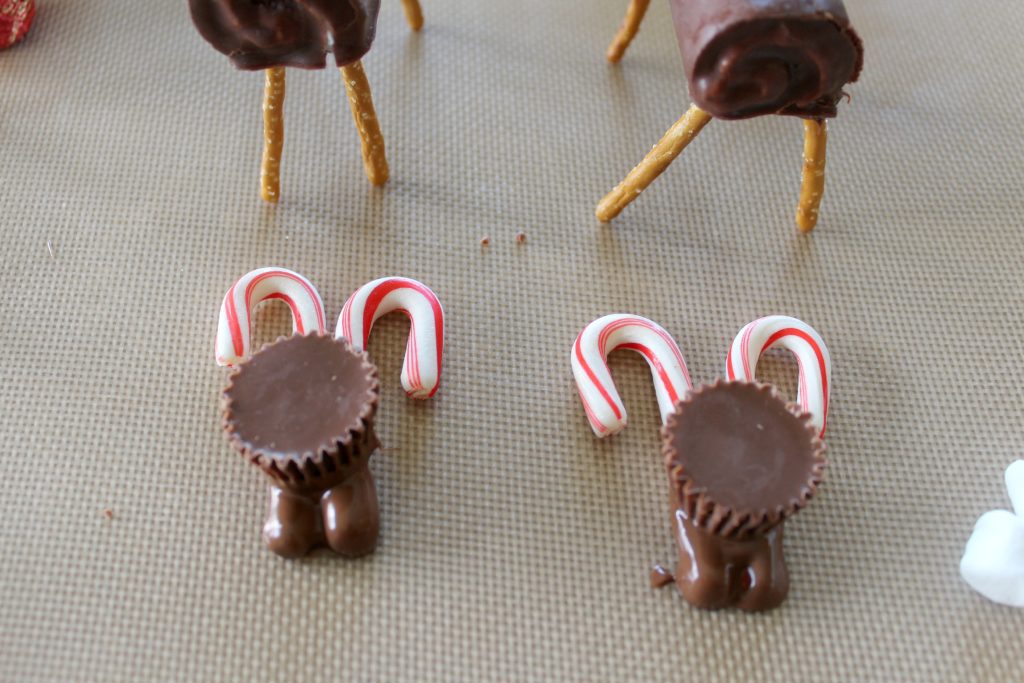
Dip the end of two mini candy canes in melted chocolate – place the candy canes, with the stick part touching, together to form antlers.  Immediately place a peanut butter cup, bottom side, on the melted candy.  Lay on the parchment paper to harden.  You can set  it in the fridge to harden faster if needed.

Use melted chocolate to gently attach candy eyeballs and the M&M nose.

Use melted chocolate to attach the head and tail.  You will need to hold them until they are set.

Share and enjoy!

Secret Ingredient THM Buffalo Chicken Casserole (Low Carb Friendly!)

March 9, 2019 By MommyOctopus Leave a Comment
By clicking my links, I may earn a small commission to support this blog. Please see our Disclosure Policy.

Last year, we went to a friend’s house for a birthday party and she had made some buffalo chicken dip.  I had forgotten how delicious it was to eat.  I decided to make my own twist on this favorite to create our own low carb Buffalo Chicken Casserole!

Our entire family loves Buffalo Chicken Casserole, but even the kids couldn’t guess that there is a secret healthy ingredient in the mix! Would you believe a whole bag of riced cauliflower is hidden inside?  The kids are none the wiser!  I use the cauliflower to throw in a vegetable without them knowing and to make the dish stretch to feed our family of 7.

The good thing about this recipe is that you can’t really mess it up.  Simply mix everything together and bake!  If you want more spice, use more pepper jack cheese or add in some hot sauce.  Less spice?  Just go with mild cheddar and cut back on the wing sauce.  You can easily change it to make it your own.

To serve, add celery sticks, carrot sticks, or pair it with some greens for a side.  For children not following low carb, I paired it with plain pita chips and they gobbled it up!  This meal works on the Trim Healthy Mama plan as an S meal if you use an on plan ranch and on plan buffalo wing sauce.

Buffalo Chicken Casserole Recipe:


Buffalo Chicken Casserole (Low Carb Friendly!)
Recipe Type: Main
Author: Mommy Octopus
This dish is easy to make and your family won’t know the secret ingredient!
Ingredients
  • Approx. 3-4 lbs chicken breast, cooked and shredded
  • 1 cup ranch dressing
  • 1 cup buffalo wing sauce
  • 1 bag of riced cauliflower (14 oz)
  • 1 block softened 1/3 less fat cream cheese
  • 2 cups pepperjack, shredded
  • 1 cup sharp cheddar cheese, shredded
Instructions
  1. Cook and shred approximately 3 pounds of chicken breast. You can use the Instant Pot to have it ready faster.
  2. In a large bowl, combine cooked chicken, ranch dressing, buffalo sauce, riced cauliflower, softened cream cheese, and pepper jack. Stir to combine well.
  3. Spread into a greased casserole dish and top with 1 cup shredded cheddar cheese.
  4. Bake at 350 for about 35-40 minutes or until hot and bubbly
  5. Serve with celery sticks or pita chips to dip!
3.5.3251

Ham and Cauliflower Casserole

April 1, 2018 By MommyOctopus 10 Comments
By clicking my links, I may earn a small commission to support this blog. Please see our Disclosure Policy.

Ham and Cauliflower Casserole

With Easter in the bag, I found myself searching for a recipe for leftover ham.  There are so many different things to choose from, but I wanted something that was a low carb ham recipe.  I decided to use up some of our ham and make ham and cauliflower casserole instead of adding potatoes or another starch.  If you’re following Trim Healthy Mama, this would be a delicious S meal.  My kids were big fans of it, too!  It’s quite simple to prepare!

First off, I used 2 bags of frozen cauliflower florets.  You can throw in another bag if you desire!  I placed them in a casserole dish, lightly drizzled with olive oil, and seasoned with salt in pepper.  Into the oven it went at 425 degrees for about 30 minutes or until starting to brown and tender.

While that was baking, I mixed up sour cream, 1/3 less fat cream cheese, and cheddar cheese to add as a topping.  I also cubed the ham into small, bite size pieces.

Once the cauliflower was ready, I took a fork and mashed some of the cauliflower pieces into smaller pieces and then stirred in the ham.  Next I plopped the cheese mixture on top and spread out as evenly as possible.  Last, added a little more cheddar on top and put in the oven at 350 to cook some more.

Serve with a salad or other favorite vegetable for a rounded meal!  YUM!

Ham and Cauliflower Casserole Recipe:

Ham and Cauliflower Casserole
Cuisine: Low-Carb
Author: Mommy Octopus
Ingredients
  • 2 or 3 bags of 12 oz frozen cauliflower
  • 2 cups chopped ham
  • 4 oz 1/3 less fat cream cheese
  • 2/3 cup sour cream
  • 2 cups shredded cheddar cheese, divided
  • salt
  • pepper
  • olive oil
Instructions
  1. Preheat oven to 425 degrees.
  2. Place contents of 2 or 3 bags of frozen cauliflower in a casserole dish. Lightly drizzle with olive oil, salt and pepper. Stir to coat.
  3. Roast cauliflower for about 30 minutes or until tender and starting to brown.
  4. Stir together cream cheese, sour cream, and 1 cup of cheddar cheese. Set aside.
  5. Remove from oven and reduce heat to 350 degrees.
  6. Stir in the diced ham.
  7. Add the cheese mixture on top as evenly as possibly.
  8. Sprinkle remainder of cheese on top.
  9. Return to oven for about 15-20 minutes or until cheese is melted and bubbly.
  10. Serve immediately.
3.5.3229


Ham and Cauliflower Casserole - Low Carb, THM S, Keto Friendly

For more great recipes, visit our recipe page!


Chocolate Chip Pumpkin Muffins – Low Carb, Sugar Free, THM

October 7, 2017 By MommyOctopus 1 Comment
By clicking my links, I may earn a small commission to support this blog. Please see our Disclosure Policy.


A few years ago, I developed one of my favorite recipes – Pumpkin Dark Chocolate Chip Muffins.  Today as I try to follow the Trim Healthy Mama plan and cut out most sugars and wheats, I decided to remake this delicious recipe.  I think I hit it out of the park!  I tested them out on a few friends and my kids with winning results.  A lot of trial and error, but I think it’s perfect!  I’d love to hear feedback from you guys!  Presenting my Trim Healthy Mama Chocolate Chip Pumpkin Muffins!

Simply add in all the ingredients and mix well with an electric mixer.  For mine, I used Pyure Stevia Blend but it measures the same as Trim Healthy Mama’s Super Sweet Blend.  You can use whatever you have on hand.

For the chocolate chips, you can use Lily’s chocolate chips, 85% chocolate from Aldi smashed into tiny pieces, or a sugar free chocolate chip that you find.  I used Lily’s chocolate chips.

When you fill up your muffin tins, I find it easier to clean up and easier to remove if you use cupcake liners.  You can gently spray them with a nonstick spray if you prefer, too.  Be sure and fill them up generously as the cupcakes will not rise much.

I would consider this an S for Trim Healthy Mama, even with the pumpkin since it’s divided up so many times.  Just don’t overdo it and stick to about 2 muffins at a time!

I store mine in the fridge to keep longer and then pop them in the microwave for about 15-20 seconds to have it nice and warm when I want to eat one or two.  Enjoy!

Chocolate Chip Pumpkin Muffins – Low Carb, Sugar Free THM
Author: Mommy Octopus
Ingredients
  • 2 cup of Almond Flour
  • 1 TBSP Cinnamon
  • 2 tsp Pumpkin Pie Spice
  • 2 tsp baking soda
  • ½ tsp baking powder
  • ½ tsp salt
  • 4 eggs
  • 3/4 cup coconut oil
  • 2/3 cup Pyure Stevia Blend or Trim Healthy Mama Super Sweet Blend
  • 2 cups fresh pumpkin
  • 1 package Lily’s Chocolate Chips or Sugar Free Chocolate Chips or 85% chocolate bar broken into tiny pieces
Instructions
  1. Combine all ingredients in a bowl using an electric mixer. Once combined, add in the morsels.
  2. Scoop the batter into a lined and sprayed cupcake pan
  3. Bake at 350 for about 30 minutes.
  4. Allow to cool before enjoying.
  5. Makes about 24 cupcakes
3.5.3228


Sweet Santa Pancakes

December 10, 2016 By MommyOctopus Leave a Comment
By clicking my links, I may earn a small commission to support this blog. Please see our Disclosure Policy.

This is a sponsored post, written for Dixie Crystals.

santa-pancakes


My dear husband loves taking time with the kids and baking and cooking with them.  Since he’s off work this weekend, he decided to make pancakes as a treat for all of us this morning.  He wanted to do something more than just plain pancakes, though.

One of our favorite websites to search for projects with the kids is Dixie Crystal’s Kids in the Kitchen.  On their website, there is a section for Christmas Crafts and for Christmas Edible Art.  Browsing through the Edible Art, he came across these Sweet Santa Pancakes.  After a quick check of the fridge, he discovered that we had everything needed to make this adorable treat!

Ingredients for Santa Pancakes:

Buttermilk Pancakes:

  • 3 cups flour
  • 6 Tablespoons Dixie Crystals Extra Fine Granulated Sugar
  • 2 teaspoons baking powder
  • 1 teaspoon baking soda
  • 1 teaspoon salt
  • 2 1/2 cups buttermilk
  • 1 stick melted butter
  • 2 teaspoons vanilla
  • 4 eggs

Toppings:

  • Strawberries, sliced in half
  • Chocolate chips
  • Red candy coated chocolates (or part of a cut strawberry)
  • Spray whipped cream

santa-pancake-batter
Directions: 

  • In a large bowl, whisk flour, sugar, baking powder, baking soda, and salt. Set aside.
  • In another bowl, whisk buttermilk, melted butter, vanilla, and eggs.
  • Pour the wet ingredients into the dry and whisk until just combined, the batter will be slightly lumpy, as shown above.
  • Heat a skillet over medium-high heat. Ladle about 1/4 cup of batter and cook until bubbles form around the sides. Flip and cook until cooked through.

santa-pancakes-process

  • Place the pancake on a plate.  This will become Santa’s face.  Arrange the cut strawberries on top of pancake for Santa’s hat. Add chocolate chips for eyes, red candy or strawberry for nose, and spray whipped cream to make Santa’s beard.

These Santa Pancakes were so easy to make and turned out ridiculously cute!  The kids LOVED have the supplies ready and making their own creations.  They made some pretty silly Santas!  This is one project we will definitely be doing again before the season is over.

santa-pancakes-2

For more fun ideas to do with your kids during the holidays, be sure to visit Dixie Crystals’ Kids in the Kitchen website.  There are recipes and crafts both available to check out.

THM Poppy Seed Chicken – S Dinner

November 1, 2016 By MommyOctopus 8 Comments
By clicking my links, I may earn a small commission to support this blog. Please see our Disclosure Policy.

Poppy Seed Chicken Casserole - THM S Dinner - Trim Healthy Mama

My family absolutely LOVES Poppy Seed chicken.  It’s a frequent on our weekly meal plans.  I have been trying to start back again on the Trim Healthy Mama plan in order to get healthier and I haven’t been able to find a recipe for Poppy Seed Chicken that fit in an S dinner.  I simply did not want to be without one of my favorite dishes while I’m working on my health!  I came up with this recipe for poppy seed chicken that fits with the THM lifestyle.

It turned out so delicious that I think I’ll be making it this way from now on instead of our old way!  This recipe can easily be doubled or tripled to fit your family size.  I made a small batch so I could experiment.  Next time I will double it for our family size.  Here’s what I did:

First up, melt 3 tablespoons of butter and 1 teaspoon minced garlic over medium low heat until fragrant.  When it’s ready, your kitchen will know it 🙂

Stir in cream, yogurt or sour cream, cream cheese, salt, and pepper.  Continue simmering over the heat until it’s combined well  – about 5-10 minutes.

Once ready, remove from heat and stir in your chicken and poppy seeds.

Spread in greased casserole dish.  Sprinkle parmesan over the chicken.

Next up, toast your lavash bread.  I did ours right in the oven.  If you don’t have lavash bread, a few wasa crackers will be ok.  If you’re not on THM, you can use your favorite crackers.  You also could completely leave out the topping and just go with a cheesy parmesan top.

Poppy Seed Chicken Casserole - THM S Dinner - Trim Healthy Mama

Once toasted, send through the food processor to make crumbs.  Sprinkle the crumbs on top of the casserole.

Melt 3 tablespoons of butter and drizzle on top of the crumbs.  Leave the butter out if you choose to not add a topping.

Poppy Seed Chicken Casserole - THM S Dinner - Trim Healthy Mama

Bake at 375 for about 15-20 minutes or until heated through.

Enjoy with your favorited S veggies.  I paired it with asparagus sautéed in coconut oil.  Yummy!

trim-healthy-mama-poppyseed-chicken


THM Poppyseed Chicken – S Dinner
Author: Mommy Octopus
Serves: 4
Ingredients
  • 3 boneless skinless chicken breasts, cooked and shredded (about 3-4 cups of shredded chicken)
  • 3 tablespoons butter
  • 1 teaspoon minced garlic
  • 1 cup cream
  • 8 ounces plain greek yogurt or sour cream
  • 4 ounces cream cheese
  • salt
  • black pepper
  • 1 tablespoon poppy seeds
  • 1/2 cup fresh parmesan cheese
  • 2 Joseph’s Lavash Bread, toasted, and crumbled
  • 3 tablespoons melted butter
Instructions
  1. Over medium low heat, melt the 3 tablespoons butter and minced garlic until fragrant.
  2. Stir in cream, sour cream or yogurt, cream cheese, salt, and pepper. Continue simmering over medium heat, stirring frequently, until combined well.
  3. Remove from heat and add chicken and poppy seed.
  4. Transfer to greased casserole dish and sprinkle with parmesan cheese.
  5. Toast your Lavash Bread and pulse in the food processor until you have small crumbles.
  6. Sprinkle over top of parmesan cheese.
  7. Melt 3 tablespoons of butter and drizzle over top of the Lavash Bread crumbles.
  8. Bake at 375 for about 15-20 minutes.
3.5.3226

Poppy Seed Chicken Casserole - THM S Dinner - Trim Healthy Mama


Reese’s No Churn Peanut Butter Ice Cream

June 21, 2016 By MommyOctopus Leave a Comment
By clicking my links, I may earn a small commission to support this blog. Please see our Disclosure Policy.

Reese's No Church Peanut Butter Ice Cream


In summertime, we love treating the kids and staying cool with ice cream.  The other day, we made this really easy peanut butter ice cream that doesn’t require churning!  It was so simple that I’m sure my kids could make it again themselves if they wanted!

Ingredients: 

  • 2 cups Heavy Whipping Cream
  • 1/2 cup Peanut Butter
  • 14 oz Sweetened Condensed Milk
  • 1/2 cup Unsweetened Cocoa Powder
  • Small bag of Reese’s Miniatures (about 40 mini Reese’s)

Directions: 

  • Place the small bag of mini Reese’s in the freezer for about 10 mins.
  • In a large bowl add cocoa powder to sweetened condensed milk, stir until fully combined.
  • In another large bowl mix heavy whipping cream until stiff peaks form, fold in condensed milk and chocolate mixture
  • Heat peanut butter in microwave for about 20-30 seconds until melted

Reese's Ice Cream

  • Unwrap candies and cut each candy into 4 pieces
  • Fold about 2/3 of the candy pieces into the mix

Peanut Butter Ice Cream

  • Using a loaf pan, pour 1/3 of the mixture into the bottom of the pan, top with 1/3 of the melted peanut butter
  • Repeat to add 2 more layers
  • Once all layers are complete use a knife and run it through the pan to create a swirl in the mix
  • Top with remaining candy pieces
  • Freeze for at least 6 hours or overnight for best results
  • Enjoy!

Reese's Ice Cream

Premama Lactation Frozen Yogurt Pops

April 30, 2016 By MommyOctopus Leave a Comment
By clicking my links, I may earn a small commission to support this blog. Please see our Disclosure Policy.

A few months back, I told you all how I have been using Premama Lactation to help improve my milk supply.  I feel it works great and Simon doesn’t have any negative feedback 🙂

I love mixing my Premama Lactation in water for a nice berry drink, but I’ve heard that many women love mixing it with orange juice as well.

With summer coming, it’s also fun to make a treat to enjoy the extra nutrients!  Premama has shared with us a recipe to make Premama Lactation Frozen Yogurt Pops.  It’s simple!

Homemade blueberry vanilla popsicles in a bowl clear bowl against a rustic wood background

Ingredients:

  • 4 packets of Premama Lactation
  • 8 ounces low-fat plain yogurt
  • 6 ounces concentrated unsweetened fruit juice, such as mixed berry flavor
  • Blueberries
  • Dash of vanilla extract or honey

Directions:

In a medium bowl, combine the yogurt, juice, and vanilla extract or honey. Add blueberries to preference. Pour equally into four 3-ounce paper cups or a popsicle mold and then completely stir in one packet to each cup. Partially freeze for 1 hour (about the time baby is sure to awaken). Insert wooden sticks into each cup and freeze for 4 hours, or until solid.

Eat and enjoy!

Pressure Cooker Macaroni and Cheese

April 25, 2016 By MommyOctopus 6 Comments
By clicking my links, I may earn a small commission to support this blog. Please see our Disclosure Policy.

Pressure Cooker Macaroni and Cheese


Last night I found ourselves in a bit of a pinch.  On our meal plan, we had leftovers marked, but there weren’t any leftovers left! The kids were asking for macaroni and cheese and it was already after 5 o’clock.  We typically eat dinner around 5:30, so if I were to make my usual macaroni and cheese from scratch, it would have been almost 6:30.  It was also much too late to do a crockpot macaroni and cheese.  What’s a mom to do when she has a gaggle of hungry kids?  I attempted to make Pressure Cooker Macaroni and Cheese.

I decided to wing it and see if I could come up with a quick and easy recipe to feed the hungry crowd.  It was a huge hit!  So much in fact that I quickly had to make a second batch!

Directions:

First up, pull out your pressure cooker.  I have the Power Pressure Cooker XL but sometimes you can find the Instant Pot brand for cheaper.

Screen Shot 2016-04-25 at 10.03.29 AM

I put in a pound of elbow noodles, 2 tablespoons of butter, 2 tsp salt and 4 cups of water.  Selected the rice cycle for 5 minutes and pressed start.  If you don’t have a rice cycle, put it on low pressure for 5 minutes.  The noodles came out perfect for me.  Didn’t even have to drain them!  You may have to adjust the time based on your pressure cooker, but I found 5 minutes to be perfect.

Screen Shot 2016-04-25 at 10.04.23 AM

After it’s done, quick release the pressure and  keep it on the warm setting.  With the lid off, stir in 1 cup of cream, 16 oz of shredded cheddar cheese, 5 oz of shredded parmesan cheese, and 1 tsp of black pepper.  Stir the cheeses in slowly to combine well.  Serve immediately.

Pressure Cooker Macaroni and Cheese
Author: Mommy Octopus
Ingredients
  • 1 lb elbow noodles
  • 2 tsp salt
  • 2 tbsp butter
  • 16 oz shredded cheddar cheese
  • 5 oz shredded parmesan cheese
  • 1 tsp pepper
  • 1 cup heavy cream
Instructions
  1. Put the noodles, butter, salt and 4 cups of water into your pressure cooker.
  2. Select the rice cycle for 5 minutes and press start.
  3. Keep it on the warm setting with the lid off and stir in 1 cup of cream, 16 oz of shredded cheddar cheese, 5 oz of shredded parmesan cheese, and 1 tsp of black pepper.
  4. Stir the cheeses in slowly to combine well.
  5. Serve immediately.
3.5.3208


Double Chocolate Chunk Lactation Cookies!

January 15, 2016 By MommyOctopus Leave a Comment
By clicking my links, I may earn a small commission to support this blog. Please see our Disclosure Policy.

Double Chocolate Chunk Lactation Cookies

As you all know, we had our son 4 months ago.  Often during a growth spurt, it may be hard to keep up with his demand to nurse.  Today I whipped up a batch of Chocolate Chunk Lactation Cookies filled with goodies to help boost my milk supply.  Of course, I’m not a doctor, however these always work for me!  Many midwives say oats, coconut oil, flaxseed, and Brewer’s yeast can all help.  Of course we have to throw in the chocolate to make it taste extra great!  These are some of my favorite cookies!

Lactation Cookies

Ingredients

3 Tablespoons flaxseed meal
4 Tablespoons water
1/2 cup butter
1/2 cup coconut oil
4 oz cream cheese, softened
1 cup white sugar
1 cup brown sugar
2 large eggs
1 teaspoon vanilla
2 cups self rising flour
1 cup cocoa
1 teaspoon baking soda
1 teaspoon salt
4 Tablespoons brewers yeast ( do not substitute this ingredient )
3 cups old fashioned oats ( do not use quick oats )
2 cups chocolate chunks
1/2 cup pecan chips

Lactation Cookies 1

Directions 

Preheat oven to 375 °

1. Combine the flaxseed meal and water in a small dish and set aside.

2. Cream together butter, cream cheese, coconut oil and both sugars. Add vanilla.

3. Add eggs one at a time mixing well, then add the flaxseed meal.

4. Combine the flour, cocoa, baking soda, salt, brewers yeast and oats in a medium mixing bowl then gradually add to the wet ingredients.

5. Mix in chocolate chunks and pecan chips.

6. Scoop by heaping tablespoon onto an ungreased cookie sheet spacing 1-2 inches apart and bake for 11-14 minutes.

7. Allow them to cool on the baking sheet for a few minutes before transferring to a cooling rack.

Store in an airtight container.  These make wonderful gifts for nursing mamas!  Enjoy!

Double Chocolate Chunk Lactation Cookies!
Ingredients
  • 3 Tablespoons flaxseed meal
  • 4 Tablespoons water
  • 1/2 cup butter
  • 1/2 cup coconut oil
  • 4 oz cream cheese, softened
  • 1 cup white sugar
  • 1 cup brown sugar
  • 2 large eggs
  • 1 teaspoon vanilla
  • 2 cups self rising flour
  • 1 cup cocoa
  • 1 teaspoon baking soda
  • 1 teaspoon salt
  • 4 Tablespoons brewers yeast ( do not substitute this ingredient )
  • 3 cups old fashioned oats ( do not use quick oats )
  • 2 cups chocolate chunks
  • 1/2 cup pecan chips
Instructions
  1. Preheat oven to 375 °
  2. Combine the flaxseed meal and water in a small dish and set aside.
  3. Cream together butter, cream cheese, coconut oil and both sugars. Add vanilla.
  4. Add eggs one at a time mixing well, then add the flaxseed meal.
  5. Combine the flour, cocoa, baking soda, salt, brewers yeast and oats in a medium mixing bowl then gradually add to the wet ingredients.
  6. Mix in chocolate chunks and pecan chips.
  7. Scoop by heaping tablespoon onto an ungreased cookie sheet spacing 1-2 inches apart and bake for 11-14 minutes.
  8. Allow them to cool on the baking sheet for a few minutes before transferring to a cooling rack.
3.5.3208

  • 1
  • 2
  • 3
  • …
  • 6
  • Next Page »

Catch up with Mommy Octopus

Follow Me on Pinterest

Subscribe

Enter your email address:

Delivered by FeedBurner

Categories

Timberdoodle"

Grab My Button


Schoolhouse Review Crew

Everywhere

Privacy Policy | Disclosure

Copyright © 2022 · Modern Blogger Pro On Genesis Framework · WordPress · Log in

We are using cookies to give you the best experience on our website.

You can find out more about which cookies we are using or switch them off in settings.

Mommy Octopus
Powered by  GDPR Cookie Compliance
Privacy Overview

This website uses cookies so that we can provide you with the best user experience possible. Cookie information is stored in your browser and performs functions such as recognising you when you return to our website and helping our team to understand which sections of the website you find most interesting and useful.

Strictly Necessary Cookies

Strictly Necessary Cookie should be enabled at all times so that we can save your preferences for cookie settings.

If you disable this cookie, we will not be able to save your preferences. This means that every time you visit this website you will need to enable or disable cookies again.