Mommy Octopus

We can all use a few more hands

  • Giveaways
  • Travel
  • Recipes
  • Disney World Tips
  • Homeschool
  • Law Enforcement Support
  • PR Inquiries
  • Contact Me
  • About Me

Reese’s No Churn Peanut Butter Ice Cream

June 21, 2016 By MommyOctopus Leave a Comment
By clicking my links, I may earn a small commission to support this blog. Please see our Disclosure Policy.

Reese's No Church Peanut Butter Ice Cream


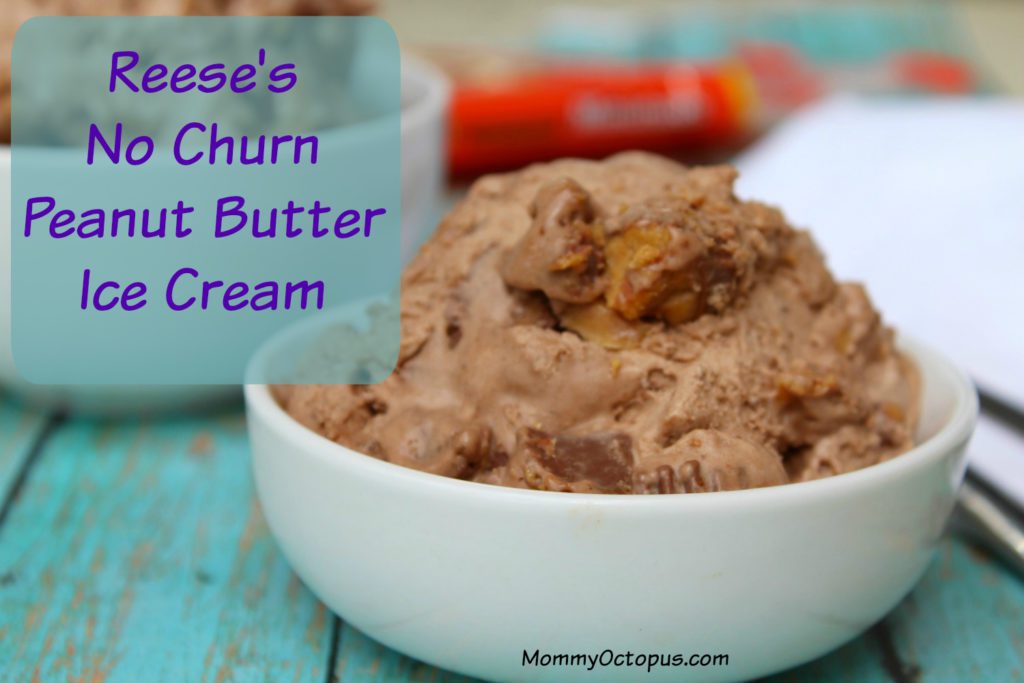
In summertime, we love treating the kids and staying cool with ice cream.  The other day, we made this really easy peanut butter ice cream that doesn’t require churning!  It was so simple that I’m sure my kids could make it again themselves if they wanted!

Ingredients: 

  • 2 cups Heavy Whipping Cream
  • 1/2 cup Peanut Butter
  • 14 oz Sweetened Condensed Milk
  • 1/2 cup Unsweetened Cocoa Powder
  • Small bag of Reese’s Miniatures (about 40 mini Reese’s)

Directions: 

  • Place the small bag of mini Reese’s in the freezer for about 10 mins.
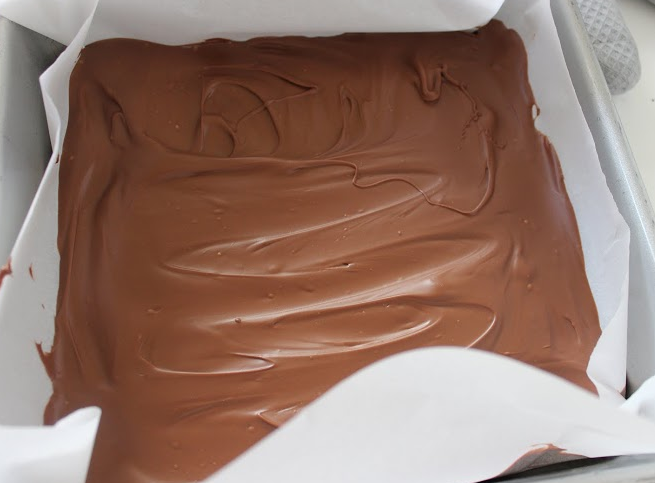
  • In a large bowl add cocoa powder to sweetened condensed milk, stir until fully combined.
  • In another large bowl mix heavy whipping cream until stiff peaks form, fold in condensed milk and chocolate mixture
  • Heat peanut butter in microwave for about 20-30 seconds until melted

Reese's Ice Cream

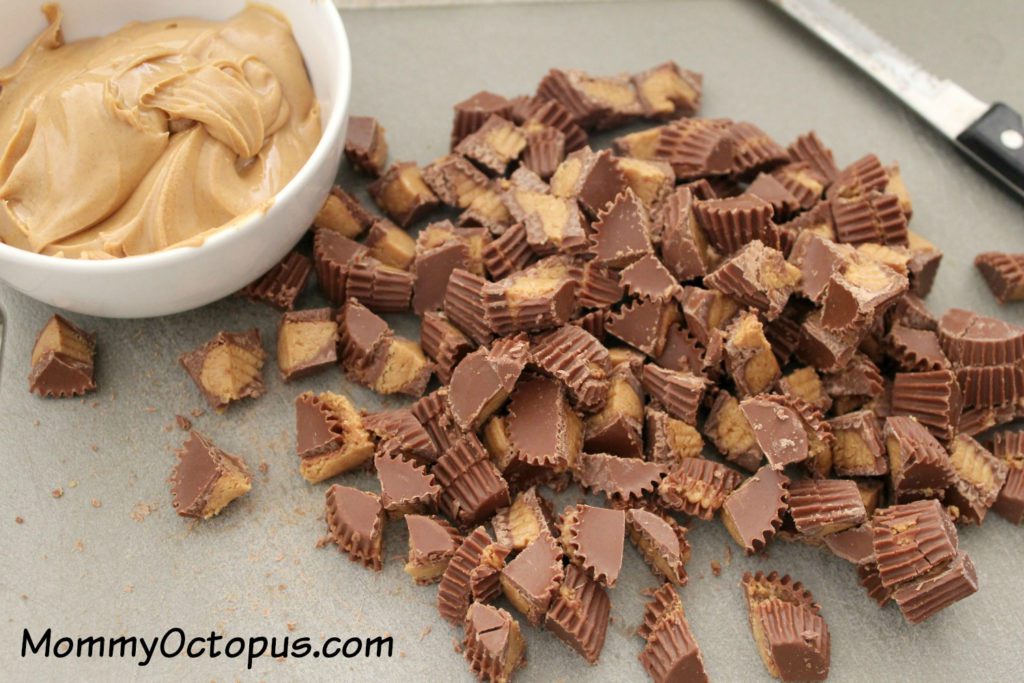
  • Unwrap candies and cut each candy into 4 pieces
  • Fold about 2/3 of the candy pieces into the mix

Peanut Butter Ice Cream

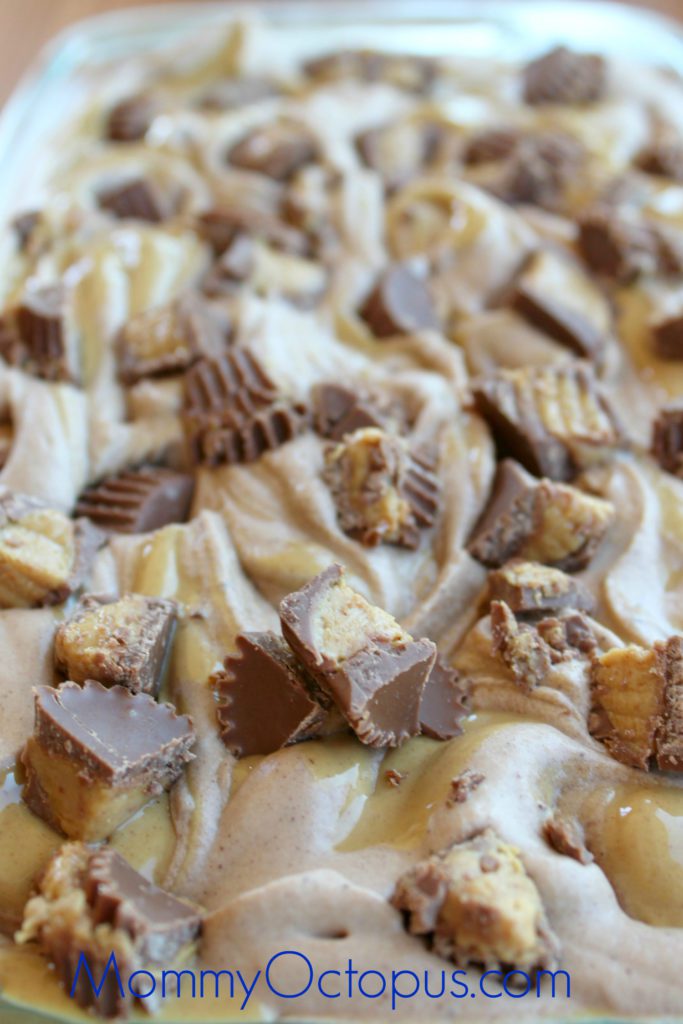
  • Using a loaf pan, pour 1/3 of the mixture into the bottom of the pan, top with 1/3 of the melted peanut butter
  • Repeat to add 2 more layers
  • Once all layers are complete use a knife and run it through the pan to create a swirl in the mix
  • Top with remaining candy pieces
  • Freeze for at least 6 hours or overnight for best results
  • Enjoy!

Reese's Ice Cream

Recipe: 3 Ingredient Guacamole – Make in 5 Minutes!

September 25, 2014 By MommyOctopus Leave a Comment
By clicking my links, I may earn a small commission to support this blog. Please see our Disclosure Policy.

3 Ingredient Guacamole - Make in 5 Minutes!


On Sunday I was in a position where I needed to fix a snack quickly for a bunch of people at my in-laws and wasn’t quite sure what I could make to serve.  I noticed that there were a bunch of avocados, but no tomatoes or onions to pair with to make my usual guacamole. They also didn’t have a food processor so I was in a bit of a pickle.

There was a can of Ro-Tel in the pantry, so I decided to wing it!  It turned out great!  Everyone was raving about it and I was surprised at how simple it was to make.

First up, you’ll need to cut open 4 or 5 avocados and take the pit out.  Put all the avocado goodness in a bowl.  Add 1/2 can of Ro*Tel and juice from 1 small lime.  You can add more Ro*Tel based on your preference.

3 Ingredient Guacamole

Using a potato masher, mash it up!  Don’t get too carried away since you will want a little bit of texture to the guacamole.  The Ro*Tel already has salt in it, so you can serve it as is or add a teensy bit if you think it needs more.

IMG_2816


Serve with chips and enjoy!

3 Ingredient Guacamole – Make in 5 Minutes!
Author: Mommy Octopus
Ingredients
  • 4-5 Avocados
  • 1/2 Can Ro-Tel
  • 1 Lime
Instructions
  1. Cut open Avocados and take out the pit. Scrape avocado into small bowl
  2. Add in 1/2 can of Ro-Tel or preference.
  3. Juice 1 lime.
  4. Using a potato masher, mash all ingredients to combine.
  5. Salt if desired.
  6. Serve with Chips.
3.2.2802


Skillet Kielbasa and Brussels with Mustard Butter Sauce

June 17, 2014 By MommyOctopus Leave a Comment
By clicking my links, I may earn a small commission to support this blog. Please see our Disclosure Policy.

Skillet Kielbasa and Brussels with Mustard Butter Sauce

Today I was staring into the fridge trying to figure out what to make for dinner.  The kids I decided would have pizza, but I wanted something different.  I really wanted some brussels.  Typically when I make brussels, I throw them in a pan with some garlic and a little butter of mustard and some butter and cook until soft and tasty.  Today I decided I didn’t want to cook everything in separate pans to lessen the clean up.  Here’s what I came up with and it was absolutely fantastic.  Can’t wait until my husband is off shift so he can try as well!

First off, I cut up a kielbasa into small slices and sliced an onion as well.  Next up, slicing the pepper.

Everything went into the pan with some butter, minced garlic, and Weber’s horseradish mustard.  My husband absolutely loves Weber’s mustard.  He grew up near Buffalo, near where it comes from and now he’s got this southern girl addicted as well!

Cook everything together for 20 minutes or so until everything is cooked and tender and enjoy!

photo 4-3


Skillet Kielbasa and Brussels with Mustard Butter Sauce
Author: Mommy Octopus
Ingredients
  • 1 Package of Kielbasa, sliced
  • 1 large onion, sliced
  • 1 red pepper, sliced
  • 1 package frozen brussel sprouts
  • 1/2 stick of butter
  • 1 tablespoon minced garlic
  • 3 tablespoons Weber’s horseradish mustard
  • mrs. dash
  • seasalt
Instructions
  1. Combine all ingredients in skillet over medium.
  2. Stir frequently to avoid burning and to combine all ingredients.
  3. Salt and Mrs. Dash lightly.
3.2.1311


Tasty Tuesday: Quick and Easy Potato Cheese Soup Recipe

January 28, 2014 By MommyOctopus Leave a Comment
By clicking my links, I may earn a small commission to support this blog. Please see our Disclosure Policy.

Quick and Easy Potato and Cheese Soup

It’s cold outside, so perfect day for this recipe!  It’s really simple and just has a few basic ingredients.

First thing to do is gather up all of those beautiful veggies and get chopping!  You can make them as small or as big as you’d like, but of course larger chunks will take longer to cook.  You can even have fun making different shapes to excite the kiddos.

Quick and easy Potato and Cheese Soup, Valentines Day Recipe Idea, Fresh Veggies

Since you’re already chopping, might as well grab a block of Velveeta and get chopping on that as well!

Quick and easy Potato and Cheese Soup, Valentines Day Recipe Idea, Milk and Cheese

Now it’s time to make some magic!  The complete recipe is below!  I hope you enjoy!

Quick and easy Potato and Cheese Soup, Valentines Day Recipe Idea 4

Quick and Easy Potato Cheese Soup Recipe
Ingredients
  • 6 cups diced potatoes
  • 1 Cup Diced Celery
  • 1 Cup Diced Carrots
  • 1/2 Cup Chopped Onion
  • 2 Tablespoon Parsley
  • 2 chicken bouillon cube
  • 1 1/2 Cup Milk
  • 2 Tablespoons flour
  • 1 lb diced Velveeta cheese
  • Salt
  • Pepper
Instructions
  1. Place in a large pot on the stove top.
  2. Add all the vegetables and bullion cubes.
  3. Cover with 7 cups water
  4. Simmer until vegetables are tender, which normally takes 20-25 minutes.
  5. Once vegetables are tender, add milk/flour mixture.
  6. Blend 1 1/2 cup milk mixed with 2 Tablespoons Flour into veggies.
  7. Stir until well blended
  8. Add 1 pound diced Velveeta cheese and stir until melted and well blended.
  9. Take off heat, salt and pepper to taste.
3.2.1275


Tasty Tuesday: Pumpkin Dark Chocolate Chip Muffins

November 19, 2013 By MommyOctopus 4 Comments
By clicking my links, I may earn a small commission to support this blog. Please see our Disclosure Policy.

Dark Chocolate Chip Pumpkin Muffins

I love Pumpkin muffins!  Our family have quickly become addicted to these delicious treats!  They are super easy to make, too!  It has become tradition that whenever we take a road trip, the kids always request these to snack on during the drive.  They aren’t loaded with junk so I don’t feel bad about letting them have them.

These Dark Chocolate Chip Pumpkin Muffins have just enough pumpkin spice and cinnamon with the perfect mixture of chocolate.

Here is the recipe that I created for Dark Chocolate Chip Pumpkin muffins.  This recipe could easily be halved if you don’t have a big family or kids that like to eat a lot.  We’ve gotten to where we double the recipe so we have muffins for all for days.

Dark Chocolate Chip Pumpkin Muffins
Author: Mommy Octopus
Ingredients
  • 2 cup of whole wheat flour
  • 1 TBSP Cinnamon
  • 2 tsp Pumpkin Pie Spice
  • 2 tsp baking soda
  • 1/2 tsp baking powder
  • 1/2 tsp salt
  • 4 eggs
  • 2/3 cup coconut oil
  • 1 cup honey
  • 2 cups fresh or canned pumpkin
  • 1 package Toll House dark chocolate chip morsels
Instructions
  1. Combine all ingredients in a bowl using an electric mixer. Once combined, add in the morsels.
  2. Scoop the batter into a lined and sprayed cupcake pan
  3. Bake at 350 for about 30 minutes or or until a toothpick inserted into the center comes out clean.
  4. Allow to cool before enjoying.
  5. Makes about 24 cupcakes
3.5.3251


Tasty Tuesday: Make Peppermint Bark

November 12, 2013 By MommyOctopus 2 Comments
By clicking my links, I may earn a small commission to support this blog. Please see our Disclosure Policy.


peppermint

Who knew that making peppermint bark was so simple and yummy?  I sure didn’t!  I’m going to be making a ton of this during the holiday season!  Here’s what you need:

Capture


Simply melt the chocolate, layer in and throw in the crushed candy canes!  MMMmmm Good!

Capture and ENJOY!


Make Peppermint Bar
Ingredients
  • 11 oz White Baking Chips
  • 11 oz Milk Chocolate Baking Chips
  • 1/2 tsp Peppermint Extract
  • 12 Candy Canes
Instructions
  1. Place Candy Canes in Food Processor and crush.
  2. Line sheet with parchment paper.
  3. Melt Milk Chocolate in microwave by heating at 50% for 1 minute and stirring until smooth.
  4. Pour milk chocolate into pan and level.
  5. Place in refrigerator for 20 minutes.
  6. Melt White Chocolate in microwave by heating at 50% for 1 minute and stirring until smooth.
  7. Add Peppermint extract to white chocolate.
  8. Pour white chocolate into pan and level.
  9. Pour crushed peppermint over white chocolate.
  10. Place in refrigerator for 20 minutes.
3.2.1255

Tasty Tuesday: Baked Apples!

November 5, 2013 By MommyOctopus Leave a Comment
By clicking my links, I may earn a small commission to support this blog. Please see our Disclosure Policy.

Delicious Baked Apples - Perfect for Apple Harvest Season!

While baked apples do take their time in the oven, they are well worth the wait.  This delicious treat is perfect for Fall, especially served alongside some vanilla ice cream! For the best outcome, apples ideal for baking work wonderfully.

Tasty Tuesday: Baked Apples!
Recipe Type: Dessert
Ingredients
  • 6 large baking apples
  • 1/4 cup brown sugar
  • 1 teaspoon cinnamon
  • 1/4 cup pecans, chopped
  • 1/4 cup rolled oats
  • 4 tablespoons butter
  • 1/4 teaspoon salt
  • 1-1/2 cups apple cider
Instructions
  1. Preheat the oven to 350-degrees.
  2. In a small bowl, combine the sugar, cinnamon, pecans, oats, and salt. Cut the butter into small pieces, and combine using the back of a fork.
  3. Remove the stems and core each apple.
  4. Push about a tablespoon of the oat mixture down into the middle of each apple. Then go back and mound the remaining filling on top of the apples.
  5. Add the filled apples to a 2-quart baking dish. Pour the apple cider into the bottom of the dish.
  6. Cover with foil.
  7. Bake for 45-minutes covered, then remove the foil and baste the apples with the cider. Continue to bake for another 15-30 minutes (depending on the size and firmness of your apples), until the apples are tender.
  8. Remove from the oven and serve immediately
3.2.1255

How To Make Snickers Minecraft Pops

November 1, 2013 By MommyOctopus Leave a Comment
By clicking my links, I may earn a small commission to support this blog. Please see our Disclosure Policy.

Snickers Minecraft Pops

Supplies

  • Pop Sticks
  • Green Candy Melts
  • Black Candy Melts
  • Snickers Bite Size
  • Toothpick

Directions

Capture

Unwrap the bite size Snickers. Then take a pop stick and push it into the Snickers, sending it almost all the way through.

Capture


Now in a coffee mug or another small size microwavable dish, melt about ½ cup green candy melts according to the directions on the bag. Dip the Snicker into the melted green candy, spinning it around so that it gets coated on all sides. Try to do it fast as the chocolate on the Snickers will melt. Place the stick end in a glass so that they are standing up.

Allow to cool/harden. After they are hardened, do it again. Buy doing a second dip you will be able to cover any remaining brown that is showing. Allow to harden.

Capture


In another small size microwavable dish, melt about 6 or 7 black candy pieces. Dip your toothpick into the melted black candy. Find the flattest side of the pops and use the toothpick to paint on the face. Make the eyes and mouth as square as possible.

Capture

Tasty Tuesday: How To Make Tie Dye Marshmallows

October 29, 2013 By MommyOctopus Leave a Comment
By clicking my links, I may earn a small commission to support this blog. Please see our Disclosure Policy.

How to Tie Dye Marshmallows!

If there is going to be a chocolate fountain at any of your holiday parties this year, or if you just think your guests would enjoy the fun festiveness marshmallows offer, you are going to want to pay attention. This holiday season, why not add some charm to your marshmallows with a pop of color? Below, you will find out how to make your very own Tie Dye Marshmallows, perfect for celebrating the holiday season in colorful style. Take a peek!

Capture
Ingredients:

  • Large, white marshmallows
  • Food coloring
  • Small bowls
  • Toothpicks
  • Cupcake cups
  • Water

Capture
Directions:
1. Begin by adding 2 drops of the your food coloring choices to individual bowls.
2. Add ¼ cup of cold water to each bowl. Mix well so the food coloring blends with the water.
3. Insert a toothpick into each marshmallow. This will act as your holder when you dip it.
4. Begin dipping by placing the bottom portion of the marshmallow into the mixture and hold it for 5-7 seconds. If you wish for brighter color, just add an extra drop of coloring and mix. Do NOT soak it in the mixture longer as it will just soften the marshmallow and make it sticky and soggy.
5. To allow the extra mixture to run off and allow the marshmallow to dry, set it onto a cupcake cup to dry.
6. Once your marshmallow is relatively dry, you can dip it in the second color. To do this, move the toothpick to the opposite end of the marshmallow (the recently colored side) and repeat the process in a new color.
8. Place the marshmallow in a clean cupcake cup so it can continue to dry.
9. Allow your marshmallows to dry for one hour before using.

CaptureNow all you need to do is gather your freshly colored marshmallows in a bowl or place them on skewers for dipping. They make not only a tasty treat, but can actually add some color and décor to your party as well. Give this simple DIY project a try and see how fun it can be to tie dye your very own marshmallows.

Capture

Simple Crock Pot Chicken Quesadilla Recipe

September 20, 2013 By MommyOctopus 2 Comments
By clicking my links, I may earn a small commission to support this blog. Please see our Disclosure Policy.

Simple Crock Pot Chicken Quesadillas


Around here, dinners often times need to be kept simple especially when we are getting home right at dinnertime from dance some days or if I know I’m going to be running errands all day.  This recipe is by far one of the most simple things that turns out perfect every time!  There usually is enough for leftovers as well!

Put the following ingredients in the crockpot on low in the morning and allow to cook all day:

  • 1 can Rotel – undrained
  • 1 package cream cheese
  • 6 boneless skinless chicken breasts

About 30 minutes before dinnertime, go ahead and shred the chicken with two forks.  It should fall apart and blend nicely with the rotel and cream cheese.  It has the most amazing flavor!  It should look like this

Capture

Now when it’s dinnertime, go ahead and heat up your frying pan, spray it and add a flour tortilla.  Sprinkle mozzerella cheese on top and add in the chicken mixture on half.  Fold over when it’s brown and enjoy your fantastic and super easy chicken quesadilla!

Capture

  • 1
  • 2
  • 3
  • Next Page »

Catch up with Mommy Octopus

Follow Me on Pinterest

Subscribe

Enter your email address:

Delivered by FeedBurner

Categories

Timberdoodle"

Grab My Button


Schoolhouse Review Crew

Privacy Policy | Disclosure

Copyright © 2023 · Modern Blogger Pro On Genesis Framework · WordPress · Log in

We are using cookies to give you the best experience on our website.

You can find out more about which cookies we are using or switch them off in settings.

Mommy Octopus
Powered by  GDPR Cookie Compliance
Privacy Overview

This website uses cookies so that we can provide you with the best user experience possible. Cookie information is stored in your browser and performs functions such as recognising you when you return to our website and helping our team to understand which sections of the website you find most interesting and useful.

Strictly Necessary Cookies

Strictly Necessary Cookie should be enabled at all times so that we can save your preferences for cookie settings.

If you disable this cookie, we will not be able to save your preferences. This means that every time you visit this website you will need to enable or disable cookies again.